- Accessing integrations
- Integrations listing
- Pipeline notifications
- Push hooks limit
- Project integration management
- SSL verification
- Troubleshooting integrations
Integrations
Integrations allow you to integrate WVS with other applications. They are a bit like plugins in that they allow a lot of freedom in adding functionality to WVS.
Accessing integrations
To find the available integrations for your project:
- On the top bar, select My Projects > View All Projects and find your project.
- On the left sidebar, select Project Settings > Integrations.
There are several integrations to integrate with. Select the one that you want to configure.
Integrations listing
Click on the integration links to see further configuration instructions and details.
| Integration | Description | Integration hooks |
|---|---|---|
| Asana | Add commit messages as comments to Asana tasks. | No |
| Assembla | Manage projects. | No |
| Bugzilla | Use Bugzilla as the issue tracker. | No |
| Confluence Workspace | Replace the link to the internal wiki with a link to a Confluence Cloud Workspace. | No |
| Google Chat | Send notifications from your WVS project to a room in Google Chat. | No |
| Jira | Use Jira as the issue tracker. | No |
| Microsoft Teams notifications | Receive event notifications. | No |
| Pivotal Tracker | Add commit messages as comments to Pivotal Tracker stories. | No |
| Prometheus | Monitor application metrics. | No |
| Pushover | Get real-time notifications on your device. | No |
| Redmine | Use Redmine as the issue tracker. | No |
| Slack notifications | Send notifications about project events to Slack. | No |
| Slack slash commands | Enable slash commands in workspace. | No |
| Webex Teams | Receive events notifications. | No |
Pipeline notifications
By default pipeline notifications only apply to the main pipeline and not the individual flows/automations that are added. For example, users can run both a Windows and a WebGL flow when a pipeline is triggered. You’re only notified if the initial setup of the pipeline fails but if your Windows build fails, you will not be notified. To enable this functionality a Personal Token needs to be added at the group level or to your project.
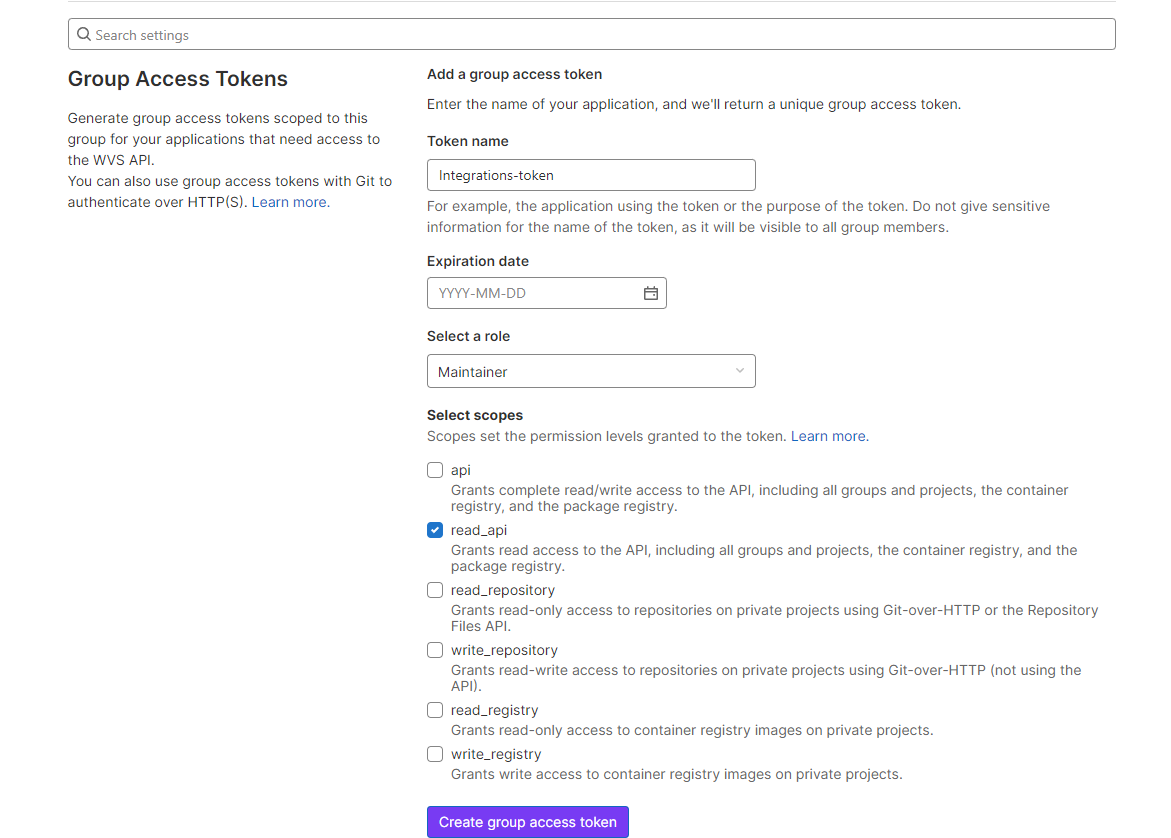
Group level
- Navigate to your Group by selecting My Group from the top-bar and select your group.
- From the left-hand nav, select Settings > Access Tokens.
- Give the token a name (i.e. Integrations-token) and select the read_api checkbox to grant permission to the token.
-
Click on Create group access token.
- Once the access token is generated, copy the token and save it somewhere.
- From the left-hand nav click on Settings > CI/CD.
- Expand the Variables scetion.
-
Click on Add variable and enter the following:
Key: WVS_PAT (Must be all caps).
Value: Paste the Token you copied from step 4. - Select Mask Variable.
- Click Add variable.
- Navigate to Settings > Integrations and select the integration you would like and continue with the setup. (Please see individual setup instructions for each integration)
Project level
- Navigate to your project, from the left-hand nav select Project Settings > Access Tokens.
- Give the token a name (i.e. Integrations-token) and select the read_api checkbox to grant permission to the token.
-
Click on Create project access token.
- Once the access token is generated, copy the token and save it somewhere.
- From the left-hand nav click on Project Settings > CI/CD.
- Expand the Variables scetion.
-
Click on Add variable and enter the following:
Key: WVS_PAT (Must be all caps).
Value: Paste the Token you copied from step 3. - Select Mask Variable.
- Click Add variable.
- Navigate to Project Settings > Integrations and select the integration you would like and continue with the setup. (Please see individual setup instructions for each integration)
Push hooks limit
If a single push includes changes to more than three branches or tags, integrations
supported by push_hooks and tag_push_hooks events aren’t executed.
The number of branches or tags supported can be changed via
push_event_hooks_limit application setting.
Project integration management
Project integration management lets you control integration settings across all projects of an instance. On the project level, administrators you can choose whether to inherit the instance configuration or provide custom settings.
Read more about Project integration management.
SSL verification
By default, the SSL certificate for outgoing HTTP requests is verified based on an internal list of Certificate Authorities. This means the certificate cannot be self-signed.
You can turn off SSL verification in the configuration settings for webhooks and some integrations.
Troubleshooting integrations
Some integrations use hooks for integration with external applications. To confirm which ones use integration hooks, see the integrations listing above. Learn more about troubleshooting integration hooks.
Uninitialized repositories
Some integrations fail with an error Test Failed. Save Anyway when you attempt to set them up on
uninitialized repositories. Some integrations use push data to build the test payload,
and this error occurs when no push events exist in the project yet.
To resolve this error, initialize the repository by pushing a test file to the project and set up the integration again.