- Process overview
- Prerequisites
- Install Git components
- Configure access in WVS
- Clone your WVS project using a Git client
- Next steps
Use popular Git clients
This page shows you how to configure popular Git clients, such as GitHub, SourceTree, GitKraken, and TortoiseGit, to work with WVS. If you haven’t used Git clients before or you want to more simplified workflow experience, use WVS Desktop Client instead.
Process overview
The process for connecting Git clients to your WVS project looks like this:
Prerequisites
You must have a WVS project. If you’re just getting started on WVS, you can follow the instructions in the Fork and clone the “Hello World” project tutorial to fork a demo project.
Install Git components
To use third-party Git clients with WVS, you must first install the latest versions of Git and Git LFS:
- Download Git for your operating system:
- Run the setup file and ensure the following components are selected:
- Git LFS (Large File Support)
- When asked to select an SSH executable, select Use external OpenSSH.
Configure access in WVS
You can authenticate your selected Git client with WVS using either HTTPS or SSH. However, we strongly recommend that you use SSH, because once you clone a WVS project using a Git client, you can interact with that project using only the protocol that you cloned it with.
WVS tools (such as the WVS CLI) require SSH, so if you clone your project using HTTPS, you can’t use WVS tools with the clone. Similarly, if you cloned your project using WVS tools, then you must use SSH to authenticate your Git client.
Create an access token in WVS for HTTPS authentication
If you want to authenticate your Git client using HTTPS (not recommended), you must create a personal access token in WVS. You must use your personal access token as your WVS password when authenticating HTTPS requests.
-
Go to the Access tokens page in the WVS web console.
- Configure the access token as follows:
- Token name: Choose a descriptive name for the access token.
- Expires at: Select an expiration date for the access token.
- Scope: Select api and read_user.
- Click Create personal access token.
- Copy and save the access token in a safe location. You cannot retrieve the access token again. If you lose your access token, you must create a new one.
Set up an SSH key for SSH authentication
If you want to authenticate your Git client using SSH (recommended), you can generate or use an existing SSH key pair. Add the public key to your WVS account and add the private key to ssh-agent.
Generate an SSH key
Note: To follow these instructions, you must have OpenSSH installed on your workstation. OpenSSH is preinstalled in Windows 10 and later versions. If you’re running an older version of Windows, you can install OpenSSH by following the instructions at Get started with OpenSSH.
If you have an existing public and private SSH key pair that you want to use, you can skip to the next section.
-
On your local workstation, open PowerShell as an administrator and run:
PS C:\>ssh-keygen -t ed25519 -
When prompted to enter a file in which to save the key, enter a path and file name or use the default path and file name shown in the parentheses by pressing Enter:
Generating public/private ed25519 key pair. Enter file in which to save the key (C:\Users\USER_NAME/.ssh/id_ed25519): -
When prompted to enter a passphrase, you can either enter a passphrase or leave it blank for no passphrase:
Enter passphrase (empty for no passphrase):
Enter same passphrase again:
Your identification has been saved in git.
Your public key has been saved in git.pub.
The key fingerprint is:
SHA256:kC3NIo23Y38vKJS45JkeYl5r5+LsKKXd8lE0FZJtz4E USER_NAME@USER
The key's randomart image is:
+--[ED25519 256]--+
|      .ooo       |
|     o.BE .      |
|    o X.+o .     |
|     + *  o      |
|     .=.S        |
|  . oooo         |
| +o++=  ...      |
|ooo=O+o ....     |
| .oBB+..   ..    |
+----[SHA256]-----+
This command creates two files on your workstation:
-
<KEY_NAME>: Stores your private SSH key. -
<KEY_NAME>.pub: Stores your public SSH key.
Example: If you entered mysshkey as the key name, you’ll see a file named mysshkey that contains your private key and another file named mysshkey.pub that contains your public key.
Add your public SSH key to your WVS account
- Locate and open
<KEY_NAME>.pubusing a text editor and copy all text in the file. -
Go to the SSH keys page in the WVS web console.
- In the Key text box, paste your public SSH key that you copied from
<KEY_NAME>.pub. - Enter an expiration date for the key.
- Click Add key.
Add your private SSH key to ssh-agent
-
On your local workstation, open PowerShell as an administrator:
- Open Run by pressing Windows+R.
- Enter powershell in the Run text box.
- Press Ctrl+Shift+Enter to open PowerShell as an administrator.
- In the User account control window that pops up, click Yes.
-
Enable and disable ssh-agent using powershell By default the ssh-agent service is disabled. Configure it to start automatically.
In PowerShell, enable ssh-agent by running:
PS C:\>get-service ssh-agent | set-service -startuptype automaticStart ssh-agent by running:
PS C:\>start-service ssh-agent -
After ssh-agent is enabled Load your SSH key files into ssh-agent by running:
PS C:\>ssh-add C:\path\to\key\fileExample:
PS C:\> ssh-add c:\users\USER_NAME\.ssh\id_ed25519 Identity added: C:\Users\USER_NAME\.ssh\id_ed25519 (USER_NAME@USER) -
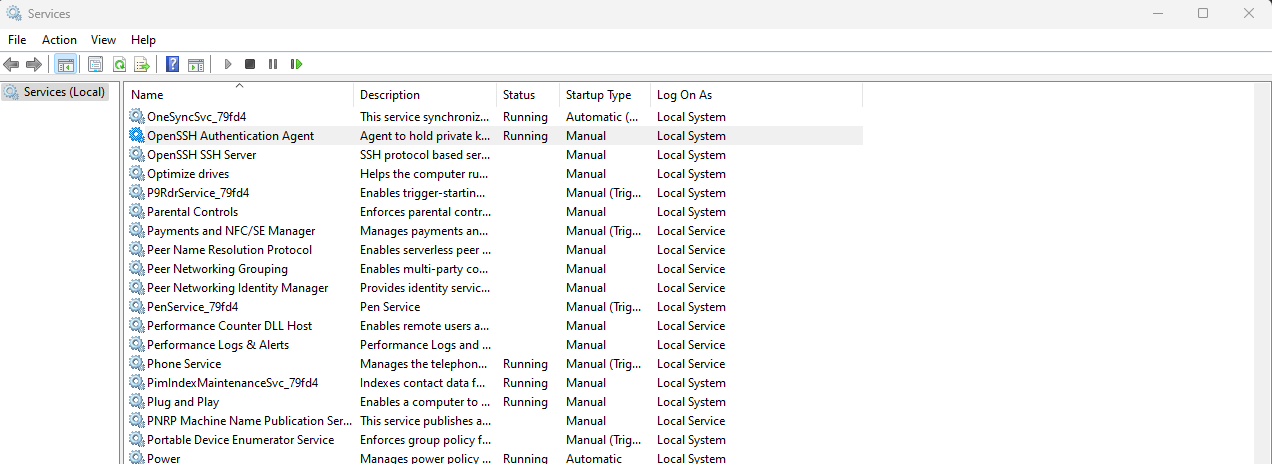
Enable and disable ssh-agent through Services app in Windows.
Another option to enable and disable ssh-agent to run is by using Services in Windows.
- In Windows, search for an app called Services and select it.
-
Once the app opens, locate OpenSSH Authentication Agent from the list. If the Status column shows the app is already running, and Startup Type is Automatic, you do not have to continue with steps 3-5.
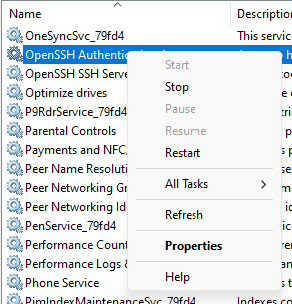
-
Right-click on OpenSSH Authentication Agent and select Properties.
-
The Properties window will appear.
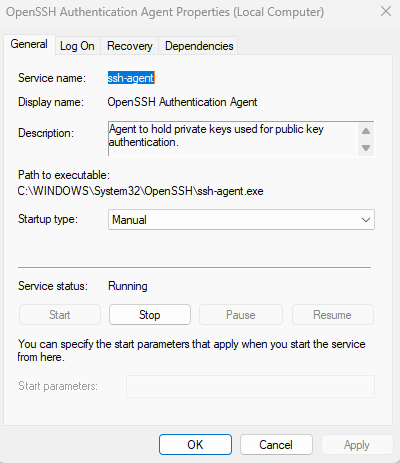
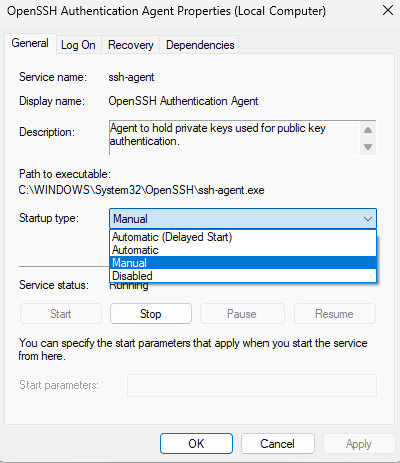
- In the Startup type section, click the dropdown and select your desired setting.
| Settings | Descriptions |
|---|---|
| Automatic (Delayed Start) | Automatically Turns on ssh-agent with a delay |
| Automatic | Automatically Turns on ssh-agent |
| Manual | User Manually starts the ssh-agent |
| Disabled | ssh-agent is disabled |
Clone your WVS project using a Git client
Once you have your personal access token or SSH key set up, you can use a Git client to clone your WVS project. This section gives you specific step by step instructions on how to clone your project using the most popular clients, but the general process should be similar for all Git clients:
- Clone your WVS project using your project’s HTTPS or SSH URL.
- Select a location on your workstation to clone your project to.
- If you’re authenticating with SSH, you may need to select OpenSSH as your SSH client or select the option to use a local SSH agent. These configurations are usually made in a settings or preferences page.
- If you’re authenticating with HTTPS, when asked to provide credentials, use your WVS username (not your email address) for the username and use your WVS private access token as the password.
Select a tab for detailed instructions:
Get the latest version of GitHub Desktop.
- Go to your WVS project’s Version control > Files page.
- Click Clone and copy your WVS project’s URL based on the protocol that you want to authenticate with.
- Go to GitHub Desktop and select File > Clone repository….
-
In the popup window that opens, select the URL tab and configure as follows:
- Repository URL or GitHub username and repository: Paste your WVS project’s URL that you copied.
- Local path: Enter the location on your workstation to clone your project to.
- Click Clone.
-
Optional: If you’re using HTTPS, a popup window appears prompting you to log in. You can log in as follows:
- Username: Enter your WVS username.
- Password: Enter your personal access token.
Get the latest version of SourceTree.
- Go to your WVS project’s Version control > Files page.
- Click Clone and copy your WVS project’s URL based on the protocol that you want to authenticate with.
- Open the SourceTree app.
- Optional: If using SSH, click Tools > Options > General and for SSH client, select OpenSSH and click Ok.
-
Click File > Clone / New…, and configure as follows:
- Source path / URL: HTTPS Clone URL of your WVS project.
- Destination path: Enter the location on your workstation to clone your project to.
- Click Clone.
-
Optional: If you’re using HTTPS and are prompted to enter credentials, you can log in as follows:
- Username: Enter your WVS username.
- Password: Enter your personal access token.
Get the latest version of GitKraken.
- Go to your WVS project’s Version control > Files page.
- Click Clone and copy your WVS project’s URL based on the protocol that you want to authenticate with.
- Open the GitKraken app.
- Optional: If using SSH, click Preferences > SSH and select Use local SSH agent.
- Select File > Clone repo.
-
Select Clone with URL and configure as follows:
- Where to clone to: Enter the location on your workstation to clone your project to.
- URL: Paste your WVS project’s URL that you copied.
- Click Clone repo.
-
Optional: If you’re using HTTPS and are prompted to enter credentials, you can log in as follows:
- Username: Enter your WVS username.
- Password: Enter your personal access token.
Get the latest version of TortoiseGit.
- Go to your WVS project’s Version control > Files page.
- Click Clone and copy your WVS project’s URL based on the protocol that you want to authenticate with.
- On your workstation, right click on any folder and select TortoiseGit > Clone….
-
In the configuration window that pops up, configure as follows:
- URL: Paste your WVS project’s URL that you copied.
- Directory: Enter the location on your workstation to clone your project to.
- LFS: Selected.
- Click Ok.
-
Optional: If you’re using HTTPS and are prompted to enter credentials, you can log in as follows:
- Username: Enter your WVS username.
- Password: Enter your personal access token.
Next steps
- Learn how to automate common tasks with flows.