- Prerequisites
- Create a Quest app
- Fork a sample project on WVS
- Point your WVS project to your Quest app
- Configure Project settings in Unity
- Add Flows to your project
- Build and deploy your project to your Quest app
- See your app on your Quest headset
Deploy Unity builds to Quest
This tutorial shows you how to build and deploy a sample WVS project to your Meta Quest developer account all from the WVS Web Client. You can use your own project or the example project provided. Once you complete this tutorial, you can see your deployed app on your Quest headset. The objectives of this tutorial are as follows:
Prerequisites
You must have a Meta Quest developer account.
Create a Quest app
You can deploy your WVS project builds directly to your Quest apps. Each Quest app has a unique App ID and an App secret, which is a token that’s used by applications to make Quest API requests. You must configure your WVS project with the App ID and App secret of your Quest app to automate the deployment of builds to your Quest app.
Additionally, your build for this tutorial deploys to Quest as a pre-release Alpha. Only invited users can find pre-release versions of Quest apps, so you must invite any users, including yourself, that you want to use your app in order for them to see it on their Quest headsets.
Create a new app
- Sign in to Meta Quest Developer Center and click My apps.
- Click Create new app.
- In the popup window, enter a name for your app and select Quest (app lab).
-
Click Create.
Once your app is created, you are taken to the Overview page of your new app in the App manager.
Get your app’s App ID and App secret
- In the App manager navigation page, select API.
- Copy and save the App ID and App secret. We use these values in later steps to point your WVS project to your Quest app.
Invite users to use your app
- In the App manager navigation panel, select Distribution > Release channels.
- Click Alpha and select the Users tab.
- Click Add users and enter the Quest account emails of the users that you want to invite to use your app, including yourself.
Fork a sample project on WVS
For this tutorial, we fork the sample project hello-world-unity-vr-quest, which you can build and deploy to your Quest app.
-
Go to the hello-world-unity-vr-quest project home page.
- Click Fork and configure your project as follows:
- Project name: Enter a name for your project or keep the original name.
- Project URL: Select the namespace for your project. It could be your personal namespace or the namespace of any groups that you own. For the purposes of this tutorial, we recommend selecting your personal namespace.
- Project slug: Enter a URL-friendly name for your project.
- Visibility level: For the purposes of this tutorial, we recommend using private visibility.
- Click Fork project.
Now you have your own copy of the hello-world-unity-vr-quest sample project.
Point your WVS project to your Quest app
To enable your forked project to deploy builds to your Quest app, your project must have the App ID of your app and the credentials for making Quest API calls.
- In the WVS Web Client, open your forked copy of hello-world-unity-vr-quest.
-
In the navigation panel, select Project settings > CI/CD.
Note: If you don’t see CI/CD, you need to select Show advanced developer tooling in your WVS profile preferences page.
- Expand the Variables section.
- Click Add variable and configure your Quest app’s App ID:
-
Key:
WVSUSR_QUEST_APPID(This was setup in the Get your app’s App ID and App secret step.) - Value: Enter the App ID of your Quest app.
- Type: Variable.
- Environment Scope: All (default).
- Protected variable: Unselect.
- Masked variable: Select.
-
Key:
- Click Add variable.
- Click Add variable again and configure your Quest app’s App secret:
-
Key:
WVSUSR_QUEST_APPSECRET(This was setup in the Get your app’s App ID and App secret step.) - Value: Enter the App secret of your Quest app.
- Type: Variable.
- Environment Scope: All (default).
- Protected variable: Unselect.
- Masked variable: Select.
-
Key:
- Click Add variable.
In addition to the credentials above, repeat the steps above and add the following variables:
| Variables | Description |
|---|---|
| WVSUSR_UNITY_PASS | Your Unity Password |
| WVSUSR_UNITY_USER | Your Unity Username |
Configure Project settings in Unity
To ensure the project deploys correctly, you will need to check a couple of settings in your project.
- Open Unity and go to Edit > Project Settings.
-
From the left-hand side, select Player and be sure to select the Android icon.
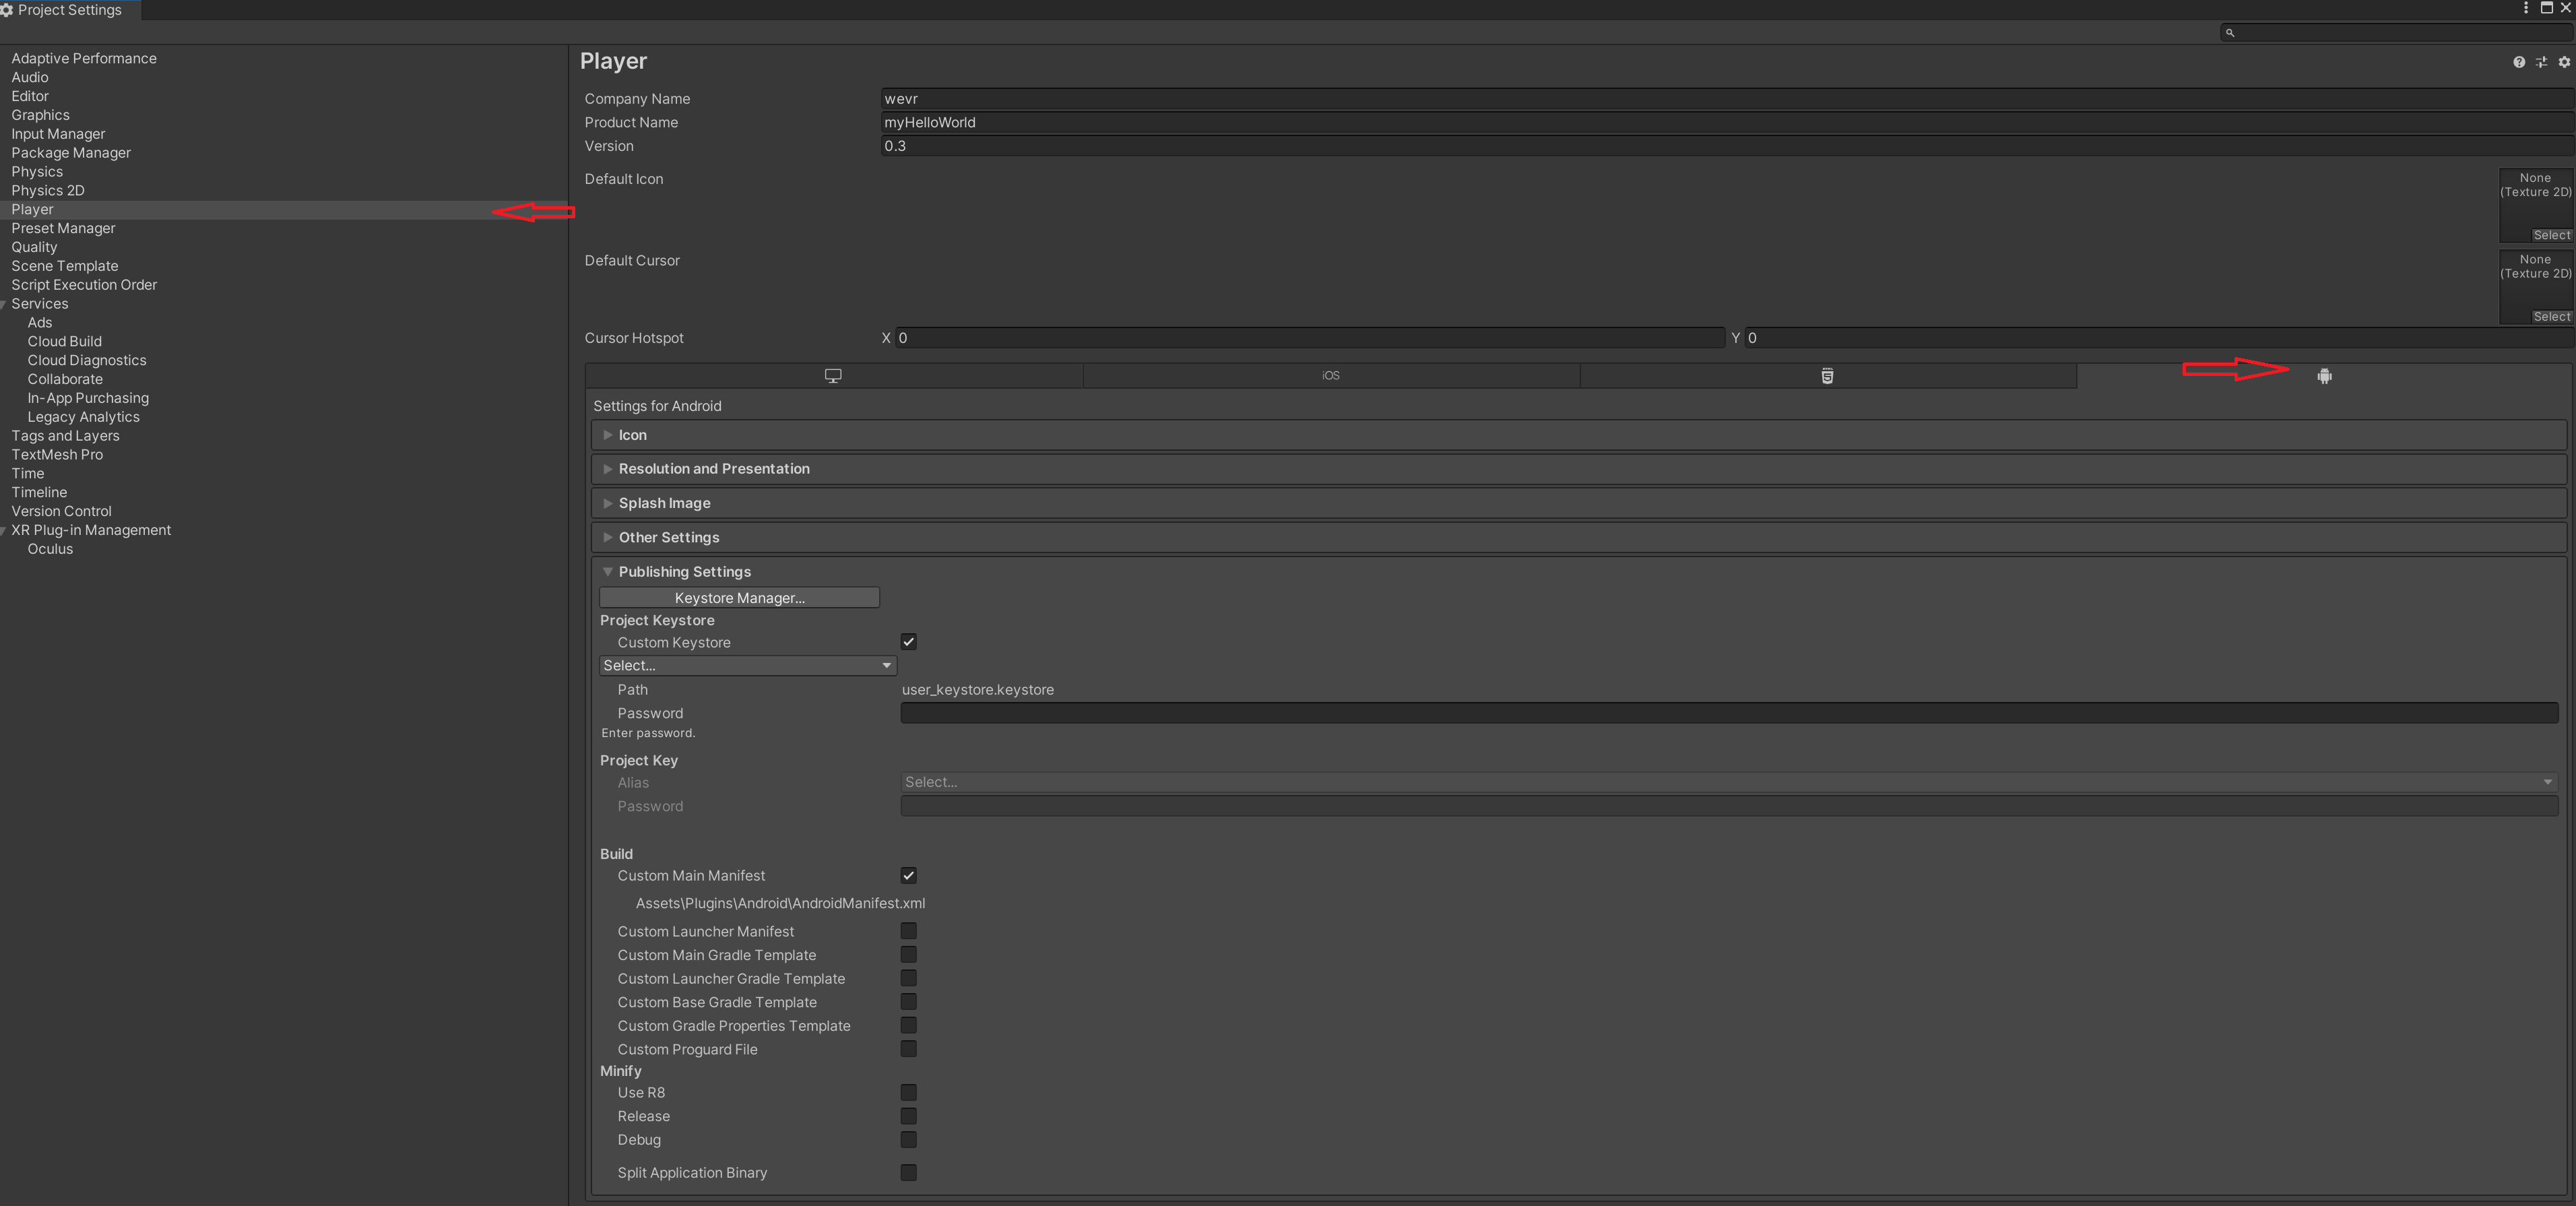
-
In the Other Settings section, in the field for Package Name, provide a unique name. It is a common practice to use a reverse domain notation.
Example: com.wvs.myCoolProject
- Check that your Product Name matches the Oculus project name that was created in your Oculus account.
- Setup your keystore in your project by following the steps in the documentation for Android Keystore for Unity.
- Grab the information in step 5 and return to your project on WVS.
- Click Add variable and configure your Android Keystore Alias Name:
-
Key:
WVSUSR_ANDROID_KEY_ALIAS_NAME(Keystore Alias name given when setting up keystore). - Value: Enter the Keystore Alias name.
- Type: Variable.
- Environment Scope: All (default).
- Protected variable: Unselect.
- Masked variable: Select.
-
Key:
Repeat the steps above for the following variables:
| Variables | Description |
|---|---|
| WVSUSR_ANDROID_KEY_ALIAS_PASS | Keystore Alias Password created when setting up Android Keystore in step 5 |
| WVSUSR_ANDROID_KEY_STORE_PASS | Keystore Password created when setting up Android Keystore in step 5 |
| WVSUSR_ANDROID_KEYSTORE_BASE64 | Encoded Keystore from step 5 |
Add Flows to your project
If you’re setting up your own project, you will need to add the correct flows to get the project to build properly. If you’re using an example project, you can skip this step since flows are already included in the project.
We will use the WVS Command-Line tool to set this up. Keep in mind, while running any of these commands, if you would like additional information on any command, you can always append ` –help` at the end.
Learn more about the CLI tool in the Documentation for the CLI.
-
Open up your command-prompt and navigate to your project directory.
cd c:\wvsProjects\my-cool-test-project -
Run the following to begin a changelist. You can add any name to your changelist in place of the example.
wvs changelist begin --name "Adding a flow" -
To see a list of available flows, run the following in your command prompt:
wvs flow registry -
The flows we will want to add are the following:
Flow Name Description build_unity_android Android build for Unity deploy_oculus Deploy a build to a channel in your Oculus developer account. Both flows are required to be able to successfully deploy. The first flow (build_unity_android) builds an
.apkwhich is the
required build format that will work on an Oculus. The second flow (deploy_oculus) will take the.apkand help you deploy to your Oculus account. -
To add, run the following two commands (separately) in your command prompt:
wvs flow add build_unity_androidHit Enter, an
OKshould be returned.wvs flow add deploy_oculusHit Enter - An
OKshould be returned. -
To check if they were added correctly, run:
wvs flow status -
Your output should display the following:
Instance Name Registry Name Catgry Enabled build_unity_android_1 build_unity_android build true deploy_oculus_1 deploy_oculus deploy true The name of your flow is the Instance Name. If you need to make changes in the future, you would use the Instance Name of your flow.
-
Now we have an Android build but we need this to send the information to your Oculus account. In order for the flows to communicate with each other, we will need to connect the two by running the following command. Here, you can see, we use the Instance Name to connect.
wvs flow connect build_unity_android_1 to deploy_oculus_1 -
To check that everything is valid, let’s run a check.
wvs flow validateAn
OKmeans, everything is working fine. If it was not setup correctly, you will get a message on what changes need to be made. -
Now we will submit our changelist.
wvs changelist finishNow you can return to your project on the WVS web app. From the left-hand side, locate Outputs > Builds to view your build progress.
Build and deploy your project to your Quest app
If you’re setting up your own personal project, you can skip this step. This project takes around 30 minutes to build.
- In the WVS Web Client, open your forked copy of hello-world-unity-vr-quest.
- In the navigation panel, select Version control > Files.
- Click the
Readme.mdfile and click Edit. - Make any change to the file and click Commit changes.
-
In the navigation panel, select Flows > Pipelines
You are taken to the pipeline details page where you can see the progress of each job.
Once all jobs successfully complete, you are ready to see your Quest app on your Quest headset.
Tip: You can see your builds in Output > Builds.
See your app on your Quest headset
You can find your app in your app library with the App lab label. If you don’t see your app in your app library, try searching for it in the Store. Once you’ve located your app, you can install it and use it.
You can also make edits in your WVS project and build and deploy it again to Quest. In this case, the next time you open your app, you are prompted that a new version of the app is available and you can update to the newer version.
Troubleshooting
For additional support, please reach out to us on our Discord.
Was this helpful?
We would love to hear your feedback, Submit a ticket in our Issue Tracker.